
Preventing Property Damage During Winter Storms

Table of Contents
Step 1: Insulate and Seal Windows and Doors
Step 2: Preventing Frozen Pipes with Insulation and Faucet Tricks
Step 3: Clear Gutters and Downspouts to Prevent Ice Dams
Step 4: Maintain Your Roof and Remove Snow Safely
Step 5: Prepare for Power Outages with Generators and Emergency Supplies
Step 6: Complete a Winterizing Home Checklist
Step 7: Get a Professional Home Risk Assessment
What to Do After the Storm: Inspection and Insurance Documentation
The first 24 hours: safety and stabilization
Post-storm inspection checklist
Insurance documentation best practices
Smart home monitoring closes the loop
Frequently Asked Questions
Last Updated: September 30, 2026
Step 1: Insulate and Seal Windows and Doors
Preventing property damage during winter storms starts with the gaps you can see and feel. Sealing air leaks keeps heat inside, lowers energy bills, and stops moisture from freezing inside your walls.
Here's what to do:
Apply caulking to cracks around window frames and sills
Add weather-stripping to door edges and thresholds
Install storm windows or clear plastic film over single-pane glass
Seal gaps around pipes, vents, and electrical outlets
Replace worn door sweeps at every exterior entry
Pro Tip Check your attic hatch and basement rim joists. These two spots leak more heat than most windows, and almost nobody seals them.
Step 2: Preventing Frozen Pipes with Insulation and Faucet Tricks
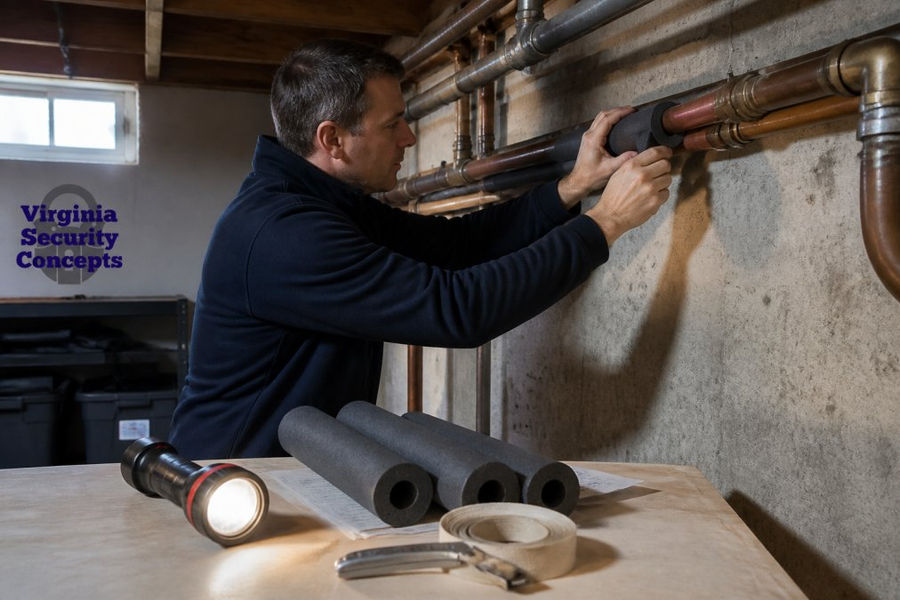
Open cabinet doors under sinks on exterior walls
Disconnect garden hoses and shut off outdoor spigots
Keep the thermostat at the same setting day and night during a cold snap
Know where your main water shutoff valve is located
Step 3: Clear Gutters and Downspouts to Prevent Ice Dams
Clearing gutters and downspouts before the first freeze is the best defense against ice dams. When gutters clog, meltwater backs up, refreezes at the roof edge, and forces water under your shingles.
Do this before winter:
Remove leaves and debris from gutters by hand or with a scoop
Flush downspouts with a hose to confirm they drain
Extend downspouts at least three feet from the foundation
Check that gutters slope toward the downspouts, not away
Step 4: Maintain Your Roof and Remove Snow Safely
A neglected roof is where winter damage begins: loose flashing, cracked shingles, and clogged vents let water and cold air in.
Ice dams forming at the eaves
Icicles hanging from gutters, a sign of trapped heat
Sagging or cracked ceiling lines inside
Visible damage to flashing around chimneys and vents
Watch Out Never chip at ice dams with an axe or ice pick. You will puncture the shingles and create a leak that costs more to fix than the dam itself.
Step 5: Prepare for Power Outages with Generators and Emergency Supplies
A power outage can last days: without heat, pipes freeze; without power, sump pumps stop working just when melting snow floods the basement.
Build an emergency supply kit with:
Non-perishable food and bottled water for at least three days
Flashlights, batteries, and a hand-crank radio
Blankets, warm clothing, and a first-aid kit
A charged phone and backup power bank
Any prescription medications
Step 6: Complete a Winterizing Home Checklist
A winterizing home checklist turns scattered tasks into one routine. Work through it in early fall, before the first hard freeze. The table below adds the why and the how much most checklists skip.
Task | When | Why It Matters | Concrete Target |
Seal windows and doors | Early fall | Cuts heat loss and drafts | Caulk gaps wider than a dime; weather-strip all exterior doors |
Insulate exposed pipes | Before first freeze | Prevents frozen pipes | Foam sleeves on every run in unheated space; pipe heat cable where temps drop below 20°F |
Clear gutters and downspouts | Late fall | Prevents ice dams | Downspouts extend 3-6 ft from foundation; gutters slope ~1/16 in per ft toward outlets |
Test sump pump | Before winter | Prevents basement flooding | Pour 5 gallons into pit; pump should clear it in under 30 seconds |
Service the furnace | Early fall | Avoids mid-storm breakdowns | Replace filter; have a technician check the heat exchanger and blower |
Stock emergency supplies | Early fall | Keeps you safe in outages | 3-day minimum of water (1 gal per person per day) and non-perishable food |
Inspect the roof | Late fall | Catches damage before snow | Look for lifted flashing, cracked sealant, and missing shingles from the ground |
Add attic insulation | Early fall | Stops ice dams at the source | Aim for R-49 to R-60 in cold climates; seal air leaks before adding batts |
Install smart leak/temp sensors | Before winter | Early warning while traveling | One at sump pit, one under water heater, one near washing machine |
Photograph and inventory the home | Early fall | Speeds insurance claims | Video walkthrough of every room plus receipts for major systems |
A few mechanisms explain why the checklist works:
Ice dams form from the top down. Heat escaping into the attic melts snow on the upper roof; meltwater runs to the cold eaves and refreezes. Insulation and air sealing attack the heat source, ventilation keeps the deck cold, and gutters carry away what melts.
Pipes burst at the weakest point, not the coldest. Ice expands, pressure builds between the ice plug and a closed faucet, and the rupture often happens where it never froze, which is why opening cabinet doors and letting a faucet trickle matters more than wrapping one visible pipe.
Sump pumps fail on the thaw, not the freeze. After weeks idle, the pump faces a sudden volume of meltwater; testing it in fall is the only way to know the float and check valve still work.
Pro Tip Set calendar reminders for two dates: one in early fall for the full checklist, and one in mid-winter to re-check gutters, attic vents, and the sump pump after the first big thaw. Winter damage compounds, a small issue in December becomes a flooded basement in February.
Key Takeaway Most winter damage starts small: a clogged gutter, a drafty door, an uninsulated pipe. Fix the small things in fall and the big problems never arrive.
Step 7: Get a Professional Home Risk Assessment
A professional home risk assessment finds problems you cannot see: leak-prone areas, attic insulation, corrosion on pipes and fittings, and overall structural integrity.
A good assessment covers:
Utility elevation for basement equipment at risk of flooding
Preventative maintenance needs across plumbing, roof, and drainage
Thermal efficiency and where heat is escaping
Property assessment notes you can hand to your insurer
What to Do After the Storm: Inspection and Insurance Documentation
Most guides stop when the storm ends. That is a mistake: the first 48 hours decide whether your claim gets paid in full, and whether a small leak becomes a mold problem.
The first 24 hours: safety and stabilization
Before inspecting anything, confirm it is safe. If you smell gas, see sparking, or hear structural creaking, leave and call the utility or emergency services from outside. Once cleared:
Photograph everything before you touch it. Wide shots of each room, then close-ups of every stain, crack, and wet surface. Include a coin or ruler for scale.
Tarp or board up active breaches (missing shingles, broken windows) to stop further water intrusion. Keep every receipt, emergency mitigation is typically reimbursable.
Document the timeline. Note the date, time, and storm conditions. Insurers ask when damage occurred, and a written log beats memory.
Do not throw anything away until an adjuster has seen it or you have photographed it thoroughly. Damaged drywall, flooring, and personal property are evidence.
Post-storm inspection checklist
Work from the top of the house down so you do not miss cascading damage:
Roof (from the ground): missing shingles, lifted flashing, sagging ridgelines, ice dam ridges at the eaves
Attic: daylight through the roof deck, damp insulation, dark water stains on rafters, frost on the underside of the sheathing
Ceilings and upper walls: brown rings, bubbling paint, or soft spots, all signs of roof or ice dam leaks
Windows and doors: cracked glass, failed seals, water tracks on sills, doors that suddenly stick (a sign of frame movement)
Basement and crawl space: standing water, damp concrete, white efflorescence on foundation walls, musty odor
Foundation (exterior): new cracks wider than a credit card, stair-step cracks in masonry, soil pulled away from the wall
Plumbing: test every faucet, look under every sink, check the water heater pan, and confirm the sump pump still cycles
Utilities: furnace, water heater, and electrical panel for moisture or corrosion
Exterior: downspouts still attached, gutters still sloped, no ice damming at the eaves, no leaning trees over the roof
Insurance documentation best practices
A claim is only as strong as its paper trail. The pattern that gets claims approved quickly:
Report promptly. Most policies require notice within a reasonable time, often days, not weeks. Delays invite denial.
Separate the cause from the damage. "Ice dam caused water intrusion, which stained the ceiling" is stronger than "ceiling is wet." Cause drives coverage.
Keep a running inventory. Item, age, approximate replacement cost, and a photo. This is where a pre-winter video walkthrough pays off, it proves prior condition.
Track every dollar. Mitigation receipts, hotel stays, rental equipment, and contractor estimates all belong in one folder.
Get written estimates from licensed contractors before permanent repairs. Insurers want to see scope, not a verbal number.
Do not sign a final settlement until you have a contractor's scope of work in hand. Supplements are common once hidden damage is uncovered.
Watch Out Never make permanent repairs before an adjuster inspects, unless the work is emergency mitigation to prevent further damage. Permanent repairs made too early can void the damaged portion of your claim.
Smart home monitoring closes the loop
Smart home monitoring turns a reactive inspection into a proactive one. Water sensors near the sump pump, a low-temperature alert on crawl space pipes, and a leak detector under the water heater warn you before damage spreads, often while you are traveling. That early warning is often the difference between a wet carpet and a full basement flood, and the sensor log becomes useful claim documentation.
Pro Tip Take a short video walkthrough of your whole home before winter starts. If a storm hits, you have proof of your home's prior condition, which settles disputes fast.
Frequently Asked Questions
What are the most common types of winter storm property damage?
The most common types are frozen pipes that burst, ice dams that force water under shingles, and roof collapse from heavy snow load. Power outages also lead to sump pump failure and water damage. Wind can tear off shingles and siding, exposing the interior to moisture. Preventing property damage during winter storms means addressing these specific risks before they start.
How does a professional home risk assessment help prevent winter storm damage?
A professional home risk assessment identifies vulnerabilities you might miss, such as inadequate attic ventilation, failing caulking around windows, or a sump pump that is not rated for extreme cold. An inspector checks your roof, insulation, and drainage systems. This proactive approach lets you fix small issues before they become costly repairs.
What should be included in a winterizing home checklist?
A winterizing home checklist should cover insulating pipes, sealing windows with weather-stripping and caulking, cleaning gutters and downspouts, and testing your sump pump. Add roof maintenance, such as removing snow and checking for ice dams. Stock emergency supplies like non-perishable food, water, and a backup generator. Finally, schedule a professional home risk assessment to catch hidden issues.
How can I prevent frozen pipes when temperatures drop?
Preventing frozen pipes starts with insulating exposed pipes in attics, basements, and crawl spaces. During extreme cold, let a faucet trickle slightly to keep water moving. Open cabinet doors under sinks to let warm air circulate. If you leave for vacation, set the thermostat no lower than 55°F. For older homes, consider pipe insulation and heat tape. A professional can assess leak-prone areas and recommend upgrades.
Book Online


Comments